About Me

My photo
I'm an artist who can't choose a medium. My current weapon of choice is a black fine line art marker, which I use to doodle pretty little illustrations. I turn them into clip art that you can purchase in my Etsy shop for use in projects like web design and scrapbooking. I live with my husband and evil black cat in Chicago.
Showing posts with label bags purses and more. Show all posts

Saturday, July 21, 2012

Red Telephone Box Wristlet - WIP

It's the middle of summer and July has been painfully slow, but instead of freaking out I've decided to use the down time to design some shiny new stuff!

I've got a notebook where I sketch out ideas for new bags, and while I keep putting stuff in it I haven't been creating anything out of it.  Well, that trend broke today.  I started today with this baby, which I'm going to call Red Telephone Box Wristlet.


I had already roughly worked out the dimensions, so I futzed with them some more and made a prototype.  The scale on my first attempt was all wrong, but the second time out I think I got things mostly how I want them.  I made a stamp for the 'telephone' text, but I only used an ink pad to save time and decided to fill it in with black fabric paint afterwards to get a feel for how a real one would look.  I think I'll have to make a stamp for the crown as well.  I painted that one by hand and it shows.

The next version of this will be so much prettier.  Fingers crossed.

Monday, June 11, 2012

More Bucket Bags!


I am a bucket bag making machine.  My Bucket Bags now come in navy blue, dove gray, and army green.  (Also available in navy and cream ticking stripeschocolate brown, and jet black.)

These bags are slightly different from the first batch, because I changed the exterior pocket.  These don't have the darts, and I modified the shape of the pocket a little bit.  I think it looks sleek and lovely this way.

I've got three more bags coming up in exciting new colors: royal blue, bright white, and wine red.  They are going to be so pretty!  I thought I would get them made today, but taking photos and updating all my shop things took much longer than I thought it would.  Hopefully I will have photos up by Wednesday/Thursday.

Get one for yourself from my Etsy shop: Rachel White Art.

Wednesday, May 30, 2012

Navy Ticking Bucket Bag

I cannot get enough of this navy ticking fabric!  I want to put it on everything!


My Navy Ticking Bucket Bag was handmade by me! The outsides and strap are made from a heavy weight cotton pillow ticking in navy and cream, which has been fused with heavy weight interfacing for added structure. The lining is made from hot pink cotton, which was also fused with interfacing. The bag is 12 inches tall, 5.5 inches deep at the widest part of the bottom, and 12 inches wide. The strap measures 22 inches - perfect for throwing over your shoulder. There is a patch pocket on the outside for handy access to cellphones and keys. This bag is very roomy, and great for everyday use.


There are so many things I love about this bag. The insides are so roomy - it holds everything! I love the outside pocket for keeping my keys and cellphone at hand. This bag is perfect for everyday use. It's casual and matches everything, but it's got a hot pink peak-a-boo surprise.


Get one for yourself at my Etsy shop.

This item was made using a Keyka Lou pattern.  I love Keyka Lou patterns.  That girl designs the cutest bags, and her Bucket Bag is one of my favorites.  Expect more Keyka Lou designs in the future.


Tuesday, May 15, 2012

Navy Ticking Messenger Bag

I love this bag!

It's made with navy ticking, fused with heavy weight interfacing for added structure and stiffness, and fully lined with hot pink cotton.  It has a hand-dyed strap made from cotton webbing with pretty nickel plated hardware.  The exterior sports two pockets, which are large enough to hold your standard paper-back book.

It's perfect.

It's the same style as my Skulls & Argyle bag.  I've found that this bag style is very functional and pretty.  It looks good on, even when loaded down with stuff, and it holds all the things I need it to with lots of room to spare.

It's a great everyday bag.

Get one for yourself at my Etsy shop.


Tuesday, April 10, 2012

Skulls & Argyle Messenger Bag


Check out my new bag!

My Skulls & Argyle Messenger Bag features a pattern that was laboriously hand stamped by yours truly.   And I do mean laboriously.

For this pattern I decided not to get hung up on perfection.  I eyeballed it, which is why the argyle is a little wonky.  I decided that it gives it charm.  I quite like it.  I laid the skulls out randomly.  When I finished printing, the skulls weren't popping as much as I wanted them to, so I filled in each of them by hand with a paint brush.


Laboriously.

I will not be doing that a second time.  I don't even want to know how long that took me, but I know I got through several episodes of Supernatural.

The exterior fabric is navy cotton duck canvas.  I used Lumiere by Jacquard fabric paint in Crimson and Metallic Silver for the argyle pattern, and Neo Opaque by Jacquard in White for the skulls.  My stamps were made from Speedball Speedy Carve.

I made up the sewing pattern myself.  The bag measures 14 inches tall, 14 inches wide at the bottom and 12.5 inches at the top.  And it's 4 inches deep, so there's tons of room inside.  The front pocket is split in two, handy for cellphones and keys, but wide enough to fit a book.

The lining fabric is white cotton, and has large interior pockets.  This was probably a mistake.  I think I'll do a zip or patch pocket next time I make a bag like this.

The strap is very long, so I can wear it like a messenger bag, and is attached to the exterior with a box stitch.

While this one is for me, I do plan on making a version to sell in my Etsy shop.


Wednesday, September 28, 2011

Union Jack Wristlet

Union Jack Wristlet by rachelwhiteart.etsy.com


I love my Union Jack wristlet so much!  It's gorgeous!  The fabrics look so luxurious next to each other - corduroy, twill and canvas - and the colors are so deep and rich.  I like the size too.  It's a little more square than my other wristlets.

The Union Jack Wristlet was made by me, and measures 4 1/4 x 6 inches (11 1/2 with the strap). It showcases a British flag stitched from luxe fabrics. The exterior is made of navy twill, crimson corduroy, and cream canvas. The interior is made of a matching cotton in a crimson and brown stripe.

I was really hoping that I would screw this one up just a little bit so I could keep it for myself.  Get it for yourself or your favorite Anglophile from my Etsy shop.

Monday, September 19, 2011

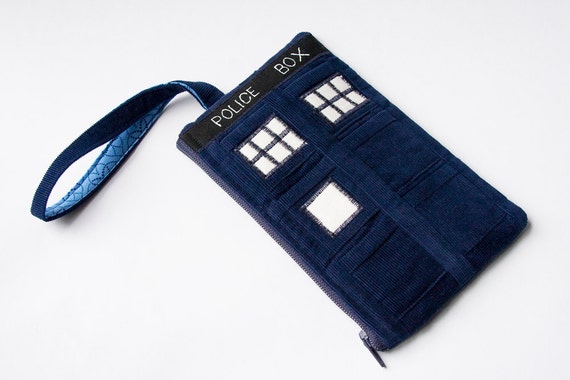
Police Box Wristlet in Navy Corduroy

Police Box Wristlet in Navy Corduroy
I love my Police Box Wristlet in navy corduroy!  I mean, the canvas version is very nice (and a perfect TARDIS blue), but this one is just so damn pretty.

I used a navy corduroy with very narrow lines, and matching blue cotton for the interior lining.  It measures 7 x 4 inches (with the strap 12 1/2 x 4 inches). It rocks appliqued details with zig zag stitching, six tiny decorative pockets, and cotton lining fabric in coordinating colors. The exterior has been interfaced for added structure.

Wristlets are perfect for running errands or a night on the town - anywhere you don't want to haul around a big purse. Perhaps on an adventure through time and space?

Friday, September 9, 2011

Hogwarts House Wristlets - Gryffindor & Ravenclaw

Gryffindor Wristlet
Ravenclaw Wristlet

Show your Hogwarts House allegiance with my super adorable and preppy wristlets!  They each feature a house badge motif in metallic fabric paint on their house colors which are finely stitched on, along with a double diagonal stripe in their house colors.

Only two more houses to go!  I'm going to try to get the Slytherin one made tonight.

(Dear Camera/Photoshop/RAW editor thingy/my eyes - White balance.  It's a thing.  Figure it out.)

Monday, August 15, 2011

Screen Printing

I have had a really busy day.  I went to JoAnn Fabrics, and spent far more than I intended to.  (It's those damn remnants.  I just can't resist!)  Then I walked home with my bag of goodies and proceeded to sew things.  I worked on a bag for myself - it's navy, red and awesome - and a houndstooth pattern quilted thing that I was going to use for a clutch, but the pattern is larger than I envisioned so I think I'll have to try again, and in between all of this I worked on my screen printing designs.

They are both fandom designs (and both spaceships... hm).  One of the Enterprise which says, 'Boldly Go', and the other is of the TARDIS and one of my favorite Eleven lines, 'Come along, Pond.'  And they both turned out so well!

My 'screen printing' method is more of a fancy stencil, but it's going to last longer.  This is how I did it:

You'll need:
  • small embroidery hoop (get the cheapest ones you can find)
  • sheer fabric (but woven tightly enough that it will hold the Mod Podge.  I got 'bridal organza' out of the remnant bin, and it worked perfectly for my fine detailed designs)
  • Mod Podge
  • tiny paintbrushes (your choice)
  • your black and white design printed to a size that fits well within your hoop
  • a fine point Sharpie
  • tape
  • light body acrylic fabric paint (I think it's actually used for air brushing)
  • a stiff bristled brush

Fit the sheer fabric in the embroidery hoop, cut off excess, but leave about an inch all the way around.  Tighten.

Put rolls of tape near top and bottom of your design, and press the hoop face side down onto the paper.  The tape is just there to hold it in place while you draw.

Trace your design with the Sharpie.  I like to stay inside the lines, that way I know exactly how far my Mod Podge should go.  Be patient and do this part right.  It will make the painting easier.

Remove paper design and tape from hoop.  Mod Podge all the areas of your design that you don't want to be screen printed.  This is where fine tip paint brushes come in handy.  I found it helped to hold my hoop towards a light.  That way I could see the little holes I'd missed filling in, and it was easier to discern the edges.

Allow to dry.  You may need a second coat if you missed lots of holes the first time.

Choose your screen print color, and with your stiff bristled brush get some paint on your brush and tap off excess paint on your palette.  Apply brush in firm, short strokes to the bare areas of your design.  Do not use too much paint - it will seep.  When you feel the design is covered to your satisfaction (look at it from several directions in the light to see spots you missed (unless you're going for the weathered look, then just ignore me).  Carefully lift up the hoop.  Start with one side and keep lifting in that direction.  If you aren't careful your design will smudge.

And that's it! 

I started with the Enterprise.  I didn't have Mod Podge then, so I was using acrylic gel medium with some yellow paint mixed in so I could see where I'd painted already.  It worked, though I had to use two coats.  I was able to find Mod Podge at the grocery store (miracle!), and used it for the TARDIS.  The Mod Podge just worked better.  I only had to do one coat.

I'm going to use both of these designs to make little wristlets to start with.  (I love my TARDIS wristlet.  I've been taking it everywhere, and everything I need fits inside it - so I want more wristlets.)  I'll likely use my screen print designs on other things later.  I'm really pleased with how they turned out!  I will definitely be making more of them in the future.

(Note: I have no idea why the photograph looks like that. I must have done something weird while I was editing it.)

Friday, August 12, 2011

Police Box Wristlet

Police Box Wristlet
In today's edition of 'what I made today', I present to you the Police Box wristlet!

It measures 6 1/2 x 4 inches, rocks appliqued details, a decorative button, and (though not seen in the photo) very timey whimey lining fabric.

I made the prototype of this design yesterday, and all was going well, but I screwed up the liner at the very end.  Lesson learned, I maximized my productivity today and attempted to make three of these babies at once.  I was only able to make two (I ran out of timey whimey lining fabric and zippers), and the second one (not pictured) came out perfect.

You can get your own Police Box Wristlet at my Etsy shop.